Showing posts with label Practicing Creativity. Show all posts

July 15, 2010

Sketch Challenges and a News Update

Good morning everyone!  I've got a couple more sketches done for the Practicing Creativity Challenges that end today.  And I've got some news since so much has been happening in my life these last couple of months.

Anyhow let's start with the first card.  For this sketch there was no doubt that I was going to use the PCD Look Up Set!  It's my all time favourite set and pair it with the clouds "You're Dandy" and you have one fun card.  My favourite parts of this card are button basket and the sentiment panel made up of Cosmo Cricket ledger paper, PTI ric rac and PCD banner stamp.  The sentiment was made from the Fanciful Swirls font from Hero Arts.

Now for my second fun card but this time for boys, I used up some of my Cogsmo (Cosmo Cricket) pattern paper and some hand stitching to bring a little something original to the card.  Things were simplified by using the border paper for the horizontal lines and a tag for that focus panel. I used three different types of stitches and different fonts for the printing.  Happy Birthday sentiment is from the PCD set "You're Dandy" and the Friend sentiment was made using the fanciful swirl font from Hero Arts.

Now for my news!  I've managed to find a job willing to give me the hours that will work nicely for my family at least during the school year.  So I'll be going back to work for 30 hours a week starting next week as well as a bookkeeping side job on the weekend.  I will be very busy for the next little while and in September we move into our new house so I will also be preparing for that.  We haven't sold this house yet but it will happen and in the meantime we don't have the money worries now that I'll be back at work. I don't know how much time I'm going to have to do what I love but I hope you will all keep in touch by email if you haven't seen much of me.  I still want to try and get at least one post done per week but at this point in time I have no idea how I'll adjust to the new routine.  One foot in front of the other.

My daughter broke my heart the other night while I was tucking her into bed.  She's very upset that I'll be going back to work.  I tried to explain that with the extra money we may be able to get to Disneyland sooner.  She's been asking to go for the last 6 months since 2 of her friends have already been.  And her response "Mommy I love you more than Disneyland and I want you to stay home."  What could I really say?  It brought a tear to my eye that's for sure.  It just goes to show that our kids would rather have our time and attention than anything material.

July 11, 2010

Practicing Creativity with Iris Folding

I finally found some time last night to play around with those sketch challenges Courtney has going on her blog.  There are four sketches and up for grabs is a $50 gift certificate for Practicing Creativity Designs (PCD).  Wouldn't that be handy?  I'd be able to add the last three stamp releases to my collection....and buy some May Arts ribbon as well.

Anyhow with this box sketch I was inspired to give Iris folding a try.  It's not very hard once you figure out a couple of tricks like the fact that you might need wider strips to start the pattern (at least if it's a larger pattern).  Also if it's thicker pattern paper you're using then you can't do as many layers as you might want to.  I'm proud of this card not only because I tried something different but because I managed to incorporate three different papers from three different manufacturers and I think it turned out wonderfully.

I have no idea why I came up with something for Saint Patrick's day but I came across my PTI Luck of the Irish set which I hadn't used yet and I was feeling pretty LUCKY.  Of course because this was a PCD challenge I had to incorporate one of Courtney's sets.  I used the For the Love of Dots to frame my art work.  There's always room for a little PCD =)

Elements

Paper: Very Vanilla, River Rock, Early Bird dp (Cosmo), Nook & Pantry dp (BG), Kaisercraft dp
Ink:  Always Artichoke
Accessories: cutting blade, iris folding pattern, foam tape, 1 1/4" circle punch
Stamps: Luck of the Irish (PTI), For the Love of Dots (PCD)

June 14, 2010

A Little Bit of...

PTI in my life, A little bit of PCD by my side,
A little bit of paper's all I need, A little bit of Beauty's all I see.

With all the sunny weather we've been having around here it put me in mind of Lou Bega's Mambo number 5.  I remember the summer that was popular, shortly after my grad, does that age me?

Anyhow, here's my entry for the current Play Date Cafe colour challenge.  Not only did I love the colours but Practicing Creativity Designs is sponsoring the challenge and up for grabs is the latest set Barefoot Summer.  I'm already creating scenes in my head with that set.

For this creation I used PCD For the Love of Dots set for the background stamping.  I also used my new PTI anniversary set and On my Couch Dies.  I don't have the label die for the anniversary label stamp but it fits nicely into the petite oval nestabilities.  

Anyhow I have to run, I'll add more info as soon as I have the time.  I've got a couple of viewings for our house so I should be cleaning my floors.  Have a fantastic week everyone!

May 25, 2010

Key to My Happiness

Hello friends!  Today I get to show you my card for this weeks Viva la Verve sketch challenge and another favourite room in my house.  Besides the sketch we were meant to find inspiration in our craft rooms.  Well  my inspiration came purely by the fact of how much happiness my little space brings to me everyday.  It's the place where I can express myself and loose myself, a space in all my house that I can call mine.  It is a key to my happiness (besides the love and support of my family of course :)

My craft room never use to look so well organized and tidy but since we've been trying to sell our house I've had to minimize the clutter.  I also have a closet full of supplies right next to the desk.  And a couple of boxes of stamps in the storage room and about 6 pizza boxes of paper organized under the guest bed in the same room.  

Steps

1) Make A2 card from CS
2) Trim designer papers and attach ribbon; adhere to card
3) Die cut oval; stamp image and sentiment; attach ribbon loops to oval; adhere with foam tape to card
4) Attach buttons to card with glue dots.

Elements

Paper: Kraft, Whisper White, Raspberry Tart dsp (SU!), Cupid (Bo Bunny)
Ink: Rose Red, Basic Black
Accessories: New leaf twill ribbon (PTI), Rose Red grosgrain (SU!), White Satin ribbon (Practicing Creativity),  yellow and green satin ribbon (chatterbox), Raspberry Fizz (PTI), New leaf buttons (PTI), oval nestie (Spellbinders), foam tape (dollar store)
Stamps: Key to My Heart (Practicing Creativity), Whimsical words (SU!)

May 20, 2010

Hey Friend

It's another post in less than 24 hours!  If you missed my earlier post I would be delighted if you scrolled down or click here. Here's something I made for the current Card Positioning Systems sketch.  As soon as I saw it I thought buttons and then framing a scene.  Which is what I did using my favourite Look Up set by practicing creativity!  I also got a chance to try that sponged cloud technique that I've been admiring for a while.  It's such a fun and subtle way to make your clouds.  What do you think?  Have you tried it?  

The silver cord (my silver lining LOL) wrapped around the buttons was a little tricky because you don't want to wrap it too tight or it will move the buttons.  The big balloon is paper pieced of course, it's my favourite thing about this set that would be difficult to do with other balloon sets. 

Steps:

1) Cut A2 card from CS
2) trim white focus panel
3) make clouds using scallop circle punch and sponge
4) paper piece balloons and position onto card
5) stamp sentiment and balloon baskets; adhere panel to card; adhere balloons to card
6) add buttons and wrap silver cord around

Elements

Paper: Soft Sky, Whisper White, Summer Sunrise (PTI), Baby boy dsp (SU!)
Ink: Soft Sky, Wild Wasabi, versamark, Basic Black
Accessories: Lemon Tart buttons (PTI), silver cord (SU!), scallop circle punch, foam tape, sponge
Stamps: Key to My Heart, Look Up (Practicing Creativity)

May 14, 2010

Celebrate Friendship

Happy Friday friends!  It's finally here, although I had a really wonderful week.  A couple of days ago I surprisingly received For the Love of Dots in the mail and had to contact Courtney from Practicing Creativity Designs to make sure there wasn't a mistake because I know I didn't order that set.  Not that I didn't want it but I can't be buying anymore supplies right now while things are so up in the air with the house move etc. (you never know what kind of expenses you're going to have).

Well it turns out that one of my most supportive blog friends (who wishes to remain anonymous) wanted to show a small gesture of thanks and congrats.  Little did she know it was a HUGE gesture, so huge in fact that I had to restrain myself from shedding happy tears....my husband would have been worried that stamps could really make me that happy.  Practicing Creativity happens to be my big IT thing right now and I love their versatility.  Apparently my fabulous friend likes what I create with them too, so last night I had a bit of time to play and hope to bring some inspiration her way.  It amazes me so much that this virtual world of blog land could put me in contact with such a wonderful group of ladies...not because of the tangible gifts that we receive but because of the encouragement and support system that we find in one another!  What a blessing and I am so grateful!

So these cards are to Celebrate Friendship.  The first card covers a couple of challenges.  The Embellish dimension challenge and the CAS-Tastic challenge: to use circles. I used the current fall-to-layout sketch and foam tape to adhere the stripe of circles.  The buttons add even more dimension. I don't know how CAS-tastic it is considering it has a few layers but it does use a lot of white space and straight lines.  

The second card (at the very bottom of this post) was the first card I created using the same layout but in a circle. It was meant more as a warm up to get use to the colours and stamps.  I thought I would included it as well since it's not a bad card, it's just nothing special.  A good masculine birthday card maybe?


Celebration Buttons

Steps:

1) make card from card stock
2) trim white panel and mat to CS
3) stamp circles; trim and mat to CS; adhere to card with foam tape
4) stamp top line circle and sentiment on white panel
5) Adhere buttons

Elements:

Paper: Spring Moss (PTI), Ocean Tides (PTI), Chocolate chip, Whisper White
Ink: Dusty Durango, Chocolate Chip
Accessories: Buttons in Spring Moss and Tara cotta tile (PTI), brown buttons (BG), foam tape
Stamps: For the Love of Dots (PCD)

Celebrate in Circles


Paper: Spring moss (PTI), Dusty Durango, Chocolate Chip, Whisper White
Ink: Sage Shadow, Chocolate Chip
Accessories: Circle Coluzzle tool
Stamps: For the Love of Dots (PCD)

April 29, 2010

Remember Paper Lunch Bags?

I remember my dad writing loving notes in big black sharpi on my paper lunch bags.   Looking back now it is fond memory but back then, especially in high school, I thought my dad was one big geek and it was embarrassing.  At least Mom had the decency to tuck a little note inside my lunch.  In the end though it was nice reminder that I was loved and appreciated.

I was browsing the featured Etsy shop Bee Things for the current Etsy Inpired Challenge, I came across these adorable graphic monkey paper bags. I knew then exactly what I wanted to do.  Something for my kids except much cooler than black sharpie.  I think it's even something I could give my son (at least in kindergarden or grade one minus the ribbon).  I decided to stick with the graphic feel of Bee Things shop and created a sun with those fabulous Practicing Creativity rays.  I'm very excited with how this came out.  I know that it looks simple to do (and it is) but I was holding my breath and praying every time I stamped those rays.  I didn't want to have to start all over again.

Thanks for checking out a decorated paper bag.  If this is your first visit today, I would be delighted if you were inspired by my earlier post by scrolling down or clicking here.

Steps:

1) Trim 4 inch square Cardstock (CS); stamp rays; mat with cs; attach ribbon and adhere to bag
2) Trim 3 inch square cs; stamp rays; mat with cs; attach ribbon and adhere to bag
3) Trim 2 inch square cs; stamp rays and sentiment; mat with cs; adhere to bag with dimensionals
4) Thread ribbon through library clip and time; attach to bag.

Elements:

Paper: Whisper White, Crushed Curry, Pumpkin Pie, Old Olive
Ink: Crushed Curry, Pumpkin Pie, Old Olive (2nd ink), basic black
Accessories: stripe ribbon (May Arts, PCD), polka dot ribbon (unknown)
Stamps: You're Dandy, Look Up (PCD)

April 26, 2010

Taking the Scenic Route

Hello friends!  How's your Monday going?  The nice thing about Monday's is that there are 4 more days in the week for it to get better.  And your reward for perseverance is the weekend.  Who am I kidding?...I loathe Mondays too!  Are your weekdays just a count down to the weekend?  It's like the weekend is the destination and the Weekdays our journey....one big scenic route one that is too often taken for granted.  My crafting can get like that....I'm so focused on the end product that I don't spend as much time focusing on the steps that got it there in the first place.  

This card for the Sketch Girl Challenge and Embellish challenge was a journey for me.  I stamped and stamped and stamped this scene until I got it exactly as I wanted it.  First, I played with the stamps then finally got to a 'prototype' scene and then did it for real keeping and getting rid of techniques or elements that I used in the draft.

The Embellishment colours are very vivid and I thought I could shy away from it and pick toned down hues or I could just go for and pick the brightest colours I have.  So much fun working with those Dandy sun rays.  I haven't met a Practicing Creativity Set I haven't liked.  Since January I haven't run out of ideas on how to use them.  I haven't gotten the latest set "For The Love of Dots" yet having a stricter budget but it's definitely on the wish list. I was going to add bling and sparkles to the sun but it really took away from the natural scene I created.  There is embossing for the clouds, the raised dandelion, and the sentiment. I've got an angled shot here that shows it much better.  Lots of dimensionals and paper piecing for some detail.  At the risk of sounding proud, I'd have to say this is one of my favourites.  Probably because of the amount of thought and work that went into it. 

I realize that black and kraft weren't in the colour selection but white really was too bright and I just couldn't bring my self to make pink, blue, yellow or green dandies.  The selection colours are the main focus of my project though and I'm willing to bend the rules just a bit to make a better piece.

Thanks so much for stopping by to see my work.  Happy Crafting!!

Paper:  Kraft, Whisper White, Pacific Point, Crushed Curry, Razzleberry Lemonade dp (SU!), Night Light Louie dp (Oct. Afternoon)
Ink: Basic Black, Whisper White Craft, Crushed Curry, Garden Green, Versamark
Accessories: dimensionals, black embossing powder, white embossing powder, 1 3/4 circle punch (SU!), 1" circle punch (EK success)
Stamps:  You're Dandy (Practicing Creativity Designs)

April 21, 2010

Don't You Know?....You're Dandy

Well lucky for me my order from Practicing Creativity arrived on Monday....just in time to get my mojo running again. 

Right now I'm just focusing on getting those Verve challenges done and the PTI blog hop is happening soon too. Only two more days and I do have to make 6 cards and I'm only half done. For tthis very subtle and sweet card, I used the fourth Verve Beach Party Sketch challenge.  Isn't it Dandy?  I wonder where that saying came from?  Better question is when?  Anyone have any ideas?

Anyhow, I really don't have anything interesting to tell you today.  Am I boring or what?  Oh well, if you you have been entertained hopefully you've been inspired.  Please scroll down to see my latest...this is my third post in 24 hours.

Paper: Very Vanilla, Bashful Blue, Wild Wasabi, retired dp (SU!)
Ink: Going Gray craft
Accessories: Tab punch (SU!), pearls, Scallop border punch (SU!), Wild Wasabi ribbon, Fiskars shape cutter, clear embossing powder.
Stamps:  You're Dandy (Practicing Creativity Designs)

April 15, 2010

Remember to Look UP...


or at least ahead because you'll miss everything when you're looking at your feet!

This week Cinema Saturday Creative Challenge presents Disney Pixar's UP!  The added challenge was to use balloons.  Only one set for this creation came my mind:  Look Up by Practicing Creativity.  I'll tell you the truth, I've never seen this movie but I've heard how wonderful it is. From what I've read the plot focus' on letting go and moving on.  One of the popular quotes was "Adventure is Out There!"  And I've always thought that hot air balloons were adventurous and magical.  I haven't been on one but maybe that's where the magic lies...the imagining of what it would feel like to fly.

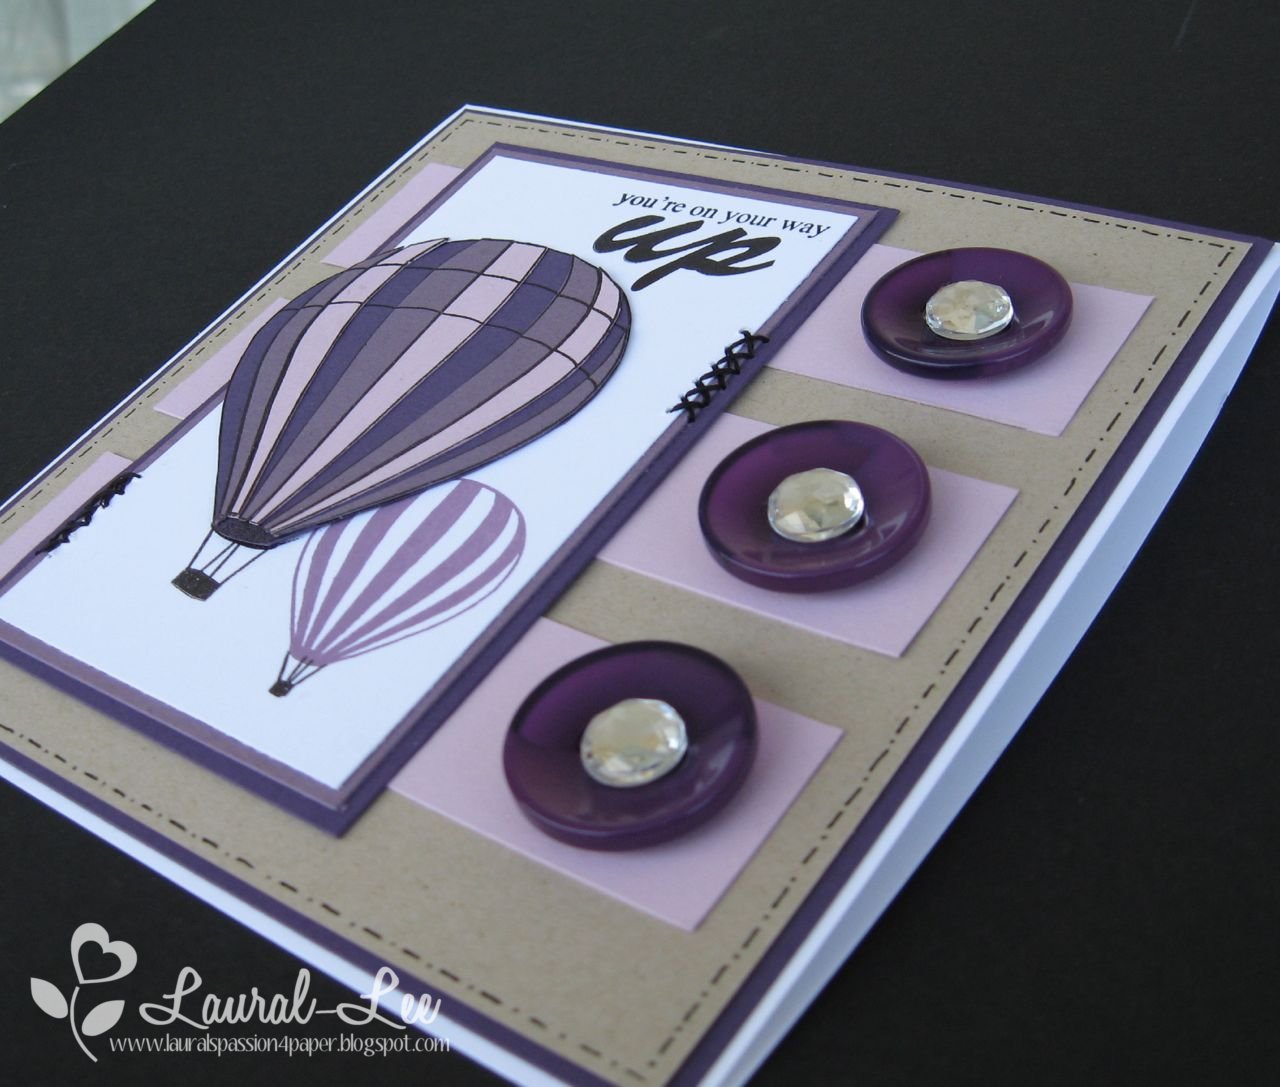
For this card I also used the sketch from Card Positioning Systems.  The side bar was screaming for big buttons but not any buttons....Purple buttons! I've been waiting for just the right project for these fantastic buttons from my daughters old shirt.  They were so large that they actually fit some really nice bling in the center.  Purple is actually one of my favourite colours but it's one I rarely use in my crafting projects and I have no idea why.  Maybe because it's not a popular colour for most people.  So if you're one of those people who doesn't care for purple I hope you can still enjoy it.  I think I broke it up with enough neutrals that it's not too much.

The balloon is paper pieced with three different shades of Purple:  Elegant Eggplant, Perfect Plum, and Pale Plum.  I added some black cross stitches to the focus panel and some faux stitching to the Kraft Panel.

This is my second post of the day so if you missed my first you can find it here.  Thanks for stopping by.  I'm now off to get dinner going and get the swim gear ready for our weekly family trip to the pool.

Paper: Whisper White, Elegant Eggplant, Perfect Plum, Pale Plum, Kraft
Ink: Basic Black, Pale Plum
Accessories:  Purple buttons, Rhinestones (Doodlebug), Black pen, Black thread

April 14, 2010

Off the Wall Craftiness Challenge #2

Yesterday I had the pleasure of coming across a new challenge and thought I would give it a go.  Love the colours and the bridal theme.  The best part of all is the prize up for grabs:  May Arts Ribbon!  Have you had the pleasure of working with it?  With this project I used the May Arts ribbon I bought from Practicing Creativity Designs a while back.  Sadly they were out of this soft, easy to work with ribbon, when I put in my last order and I've used up everything I had for this big beautiful bow.  

My goal for this project was to focus on that beautiful blue colour and the softness of the bridal theme.  The  flower is layers of PTI Aqua Mist, parchment paper, the same linen ribbon, and silver fiber paper.  The Aqua Mist paper edges were distressed using my finger nails and then rolled up into a ball and flattened again to give it more dimension (like a real flower).  This is a new technique for me and I'm really happy the way it turned out. For further texture the parchment paper flower was run through my cuttlebug embossing folder as well as the white panel.  Swiss dots can dress up almost anything!  As for the bow, the ribbon was too wide but it was thin enough to fold in half and tie without being too bulky.  Those bows are getting easier to make and this ribbon is ideal.  It's got the same easy to tie quality of organza but all the possibilities of being opaque.

Ideally I would have liked to add a bit more black for more contrast but when I was done I was too worried about overdoing it and making it look too busy. The white panel should probably have been attached to a black panel.  I also took the time to try and get some new angles on my project.  I am so not a photographer but if I want my viewers to see my art in the best possible light I should probably improve my photographing skills.  This weekend I'm hoping to make my lightbox  so that I can take photos at night and next winter.  Right now I'm lucky because it's been so beautiful I can just go out to the front porch and shoot the pics there.

Thanks so much for stopping by and I hope that you've been inspired to try out this new challenge that ends tomorrow night.  Happy Crafting.

Paper: Aqua Mist (PTI), Whisper White, Silver Fiber, Parchment
Ink: Basic Black
Stamps:  Signature Greetings (PTI)
Accessories: Large corner rounder punch, Perfect polkadots ef (SU!), Swirls ef (cuttlebug), May Arts Seafoam Linen ribbon (Practicing Creativity), Black rhinestone (Doodlebug), Flower Layers die (Sizzix)

April 12, 2010

Let's Get this Party Started!!!


Good Evening my fellow bloggers?  How was your Monday?  Mine was pretty relaxed since it was an in-service day at my daughter's school and I didn't need to leave the house for anything.  I got some Laundry done, a workout in, and even a shower!!!  Not that I usually stink but showers aren't an everyday occurrence for me unless I workout.  And hey if I do stink I'm usually in my studio not bothering anyone! LOL.

Anyhow here's what I came up with the last time I was stinkin' up my studio!  I managed to come out with something fun and stylin' for the current Embellish Magazine challenge.  I struggle with layouts so FTL85 came in handy. I used the Argyle stamps from Practicing Creativity's Key to My Heart Set.  I didn't get the seems exactly right so I added some gold stickles.  Hope that doesn't break the rules of the challenge.  The challenge was to make something that reflects party and sparkles do that well don't they?  I used the SU! Snowburst set as Fireworks...again the gold sparkles helped reflect that.  The celebrate sentiment is from PTI Signature Greetings (I just masked out the "Your Day" part)

This card would make a great one for a New Year's Eve party or a Grad party. And I think it could pass for unisex.  What do you think?  It makes me want to paarrrrty!

Thanks for stopping by and enjoy the rest of your week.  I'm off with the family to look at another house.  It looks promising....

Paper: Whisper White, Kraft, Black (PTI)
Ink: Basic Black, Real Red
Stamps: Key to My Heart (Practicing Creativity), Snowburst (SU!), Signature Greetings (PTI)
Accessories: Scallop border punch, Gold Stickles, large corner rounder punch, Basic Black grosgrain ribbon


April 11, 2010

Have You Heard?...

Courtney from Practicing Creativity (PC) is looking for a 3 member design team!  It could be you!  I know I'm just creating competition for myself but hey I don't have much experience under my belt anyway and I'm hoping that Courtney finds the right team to take her venture to new heights.  

So with my PC stamps and the current Embellish Magazine challenge colours sitting on my desk I was debating what I wanted to do with them.  What can you do with red, black, white and kraft without making it look tacky?  Elegant wedding card maybe?  One of my good college friends is getting married in August and red happens to be the wedding colour.  What could I do with the Key to My Heart set that I haven't done yet?  Well here you have it.

On the white panel I lightly penciled in four squares 1 1/4" x 1 1/4" and stamped the X pattern using the scroll stamp.  I don't even think I've used that stamp yet. Be sure to use Staz On ink....it makes the erasing of the pencil marks much easier.  Then I stamped in the small red hearts.  Unfortunately the stamp set didn't have the right sentiment for a wedding card so I had to dig into my stamp box.  The large scallop is made with the PTI die.  The fantastic thing about this die is that it doesn't matter what side of the paper you cut, both sides have the same smooth cut. No good or bad side.

Anyhow, I hope you've been inspired to show off some of your Creativity to Courtney.  Have a fabulous Monday and be sure to check back to see my actual entry for the Embellish Challenge.  This was just a warm up.

Paper: Kraft, Whisper White, Black (PTI)
Ink:  Staz On Black, Real Red, Basic Black
Stamps: Key to My Heart (Practicing Creativity), Whimsical Words (SU!)
Accessories: Real Red satin ribbon, Large scallop die (PTI)

April 6, 2010

Forever Sisters

Happy Tuesday everyone!  Hope you had wonderful Easter weekend among family and friends.  We had a very relaxing weekend around here.  On Sunday we went for an Egg hunt at the wildlife park with my dad and then we went to dh's parents place for a wonderful meal. My grandma, uncle and cousin dropped by for a visit as well.  This weekend I also managed to get my fair share of cards done and I've done up a few for the new Embellish Magazine publication call.  I'm going to finally risk rejection and submit a couple for publication. This is a big stepping stone for me.

Anyhow, here's a card that I made for the current Cinema Saturday challenge: Sense and Sensibility.  The added challenge was to create a CAS card....something I really don't do often enough.  Off to the Clean and Simple sketch blog I went and then rummaged through my paper.  I tried something with the Look Up set from Practicing Creativity that I've been meaning to do since I got it.  I stamped and cut the medium sized balloon image to make flower petals.  What do you think?  Pretty handy since I have only a couple of flower sets.  Ideally I wanted the card to POP with an orange background but then I decided to leave the colours soft and gentle like the cinematography in the movie.  This card makes me laugh because it's a pretty way of telling my sister that she drives me crazy but I love her anyhow.

Sense and Sensibility is one of my favourites and I can so relate to it.  Just call me Elinor, the older more sensible of the sisters and my younger sister could very easily pass as Marianne.  My sister is often dramatic and sensitive.  We are so opposite that many times we can have a hard time understanding each other and it doesn't help matters that I've had 8 more years of life experiences than she has.  And it's funny how the things that often annoy me, I usually admire about her the most.  I came across this sisterly quote and had to laugh.  I don't think you need a sister to understand that fine line between affection and annoyance.  Anyone who has ever loved can probably understand that....but, for me, having siblings made me understand it sooner :)

I'm posting a couple of samples of other things you can do with the Look Up set...just in case you haven't thought of about these options or you have but haven't gotten around to trying it out yourself to see how it looks.  The flowers are made of the smaller balloons and the stars are made from the banner flags.  I have to say this is one of the most versatile sets I own.  I can think of more things to do with this little set than I can with a pile of wood mounted stamp sets I own.

Thanks so much for stopping by and I hope you have a fabulously awesome day!

Paper: Lemon Tart (PTI), Whisper White, Old Olive dsp
Ink: Bashful Blue
Stamps: Look Up (Practicing creativity)
Accessories:  Lemon tart button (PTI), large corner rounder punch, blue rhinestones, linen thread, computer and printer.

March 21, 2010

Playing with Ribbon

On Friday I got my order from Practicing Creativity and I was surprised with some bonus pink ribbon. Now normally I don't work with the wide stuff and you might be able to tell by the fact that my bow isn't perfect but it was really nice to be able to practice and I think all in all it came out pretty good.  The ribbon is amazing and of course with it's pinkness I was inspired to make a baby girl card.  It's just a really simple layout with some ribbon detail.

Next I have a card that I made with some of that gorgeous turquoise linen ribbon.  I love it!  It's so soft and flexible.  I was going to make a bow but I decided to try something different.  I made 'clouds' with it by weaving it in and out of three 1/8" holes. I cut the ends and then purposely frayed them.  

I kept wanting to cut them shorter and shorter but then I was reminded of a lesson a learned in Kindergarden.  When I was five we were suppose to make these caterpillars by cutting circles (free hand) out of different coloured paper.  Well I got frustrated because my circles weren't perfect and I kept cutting and cutting hoping to turn out that perfect circle and I was left with the tiniest caterpillar in the class.  Lesson learned:  sometimes you need to stop even if it's not perfect or you'll have nothing left.  So the truth is that all the important lessons we learn in life were in fact learned in Kindergarden.

Anyhow, on with the card.  This is a 4 x 4 card I made using scraps to place in my daughter's lunch for a bit of a pick me up when she needs it.  The Basic Grey Lemonade paper is cheerful and the hot air balloon is magical.  I'm going through a bit of a hot air balloon craze...how about you, what your favourite "It" item right now?

Little Bundle
Paper: Chatterbox dp, Kraft (SU!), Very vanilla
Ink: Close to Cocoa
Accessories:  Pink May Arts ribbon (Practicing Creativity), certainly celery grosgrain ribbon, scallop circle punch, EK success border punch,
Stamps:  Punches Three (SU!)

Sky's the Limit
Paper: Lemonade dp (BG), Whisper White
Ink:  Close to cocoa, Purely Pomegranate
Accessories:  Blue Linen MayArts Ribbon (Practicing Creativity), scallop border punch (SU!)
Stamps:  Look Up (Practicing Creativity)

Visitors